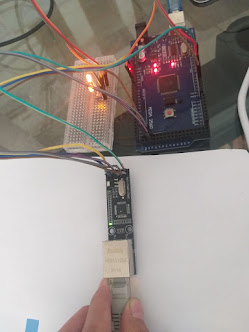
TES ETHERNET MODUL W5500 ROBOTDYN DENGAN ARDUINO MEGA 2560
ALAT-ALAT
1. ROBOTDYN ethernet module W5500
2. Kabel male female
3. Arduino mega 2560
4. Board
5. Led
6. Resistor 220 Ohm
7. Kabel ethernet
LANGKAH-LANGKAH
1. Rangkai lah robotdyn module w5500 dengan Arduino mega 2560
2. Lalu pasangkan led dan resistor 220 ohm di pin 4, 5 dan 6 kaki katoda pada resistor lalu ke IC sedangkkan kaki anoda ke ground
3. Apabila sudah selesai, maka upload program web client berikut :
/*
Web client
This sketch connects to a website (http://www.google.com)
using an Arduino Wiznet Ethernet shield.
Circuit:
* Ethernet shield attached to pins 10, 11, 12, 13
created 18 Dec 2009
by David A. Mellis
modified 9 Apr 2012
by Tom Igoe, based on work by Adrian McEwen
*/
#include <SPI.h>
#include <Ethernet.h>
// Enter a MAC address for your controller below.
// Newer Ethernet shields have a MAC address printed on a sticker on the shield
byte mac[] = { 0xDE, 0xAD, 0xBE, 0xEF, 0xFE, 0xED };
// if you don't want to use DNS (and reduce your sketch size)
// use the numeric IP instead of the name for the server:
//IPAddress server(74,125,232,128); // numeric IP for Google (no DNS)
char server[] = "www.google.com"; // name address for Google (using DNS)
// Set the static IP address to use if the DHCP fails to assign
IPAddress ip(192, 168, 0, 177);
IPAddress myDns(192, 168, 0, 1);
// Initialize the Ethernet client library
// with the IP address and port of the server
// that you want to connect to (port 80 is default for HTTP):
EthernetClient client;
int LEDmerah1 = 5, LEDmerah2 = 6, LEDmerah3 = 4; //Set Pin LED
// Variables to measure the speed
unsigned long beginMicros, endMicros;
unsigned long byteCount = 0;
bool printWebData = true; // set to false for better speed measurement
void setup() {
// You can use Ethernet.init(pin) to configure the CS pin
Ethernet.init(10); // Most Arduino shields
//Ethernet.init(5); // MKR ETH shield
//Ethernet.init(0); // Teensy 2.0
//Ethernet.init(20); // Teensy++ 2.0
//Ethernet.init(15); // ESP8266 with Adafruit Featherwing Ethernet
//Ethernet.init(33); // ESP32 with Adafruit Featherwing Ethernet
// Open serial communications and wait for port to open:
Serial.begin(9600);
pinMode(LEDmerah1, OUTPUT); //Set LEDmerah sebagai output
pinMode(LEDmerah2, OUTPUT); //Set LEDhijau sebagai output
pinMode(LEDmerah3, OUTPUT); //Set LEDhijau sebagai output
while (!Serial) {
; // wait for serial port to connect. Needed for native USB port only
}
// start the Ethernet connection:
Serial.println("Initialize Ethernet with DHCP:");
if (Ethernet.begin(mac) == 0) {
Serial.println("Failed to configure Ethernet using DHCP");
// Check for Ethernet hardware present
if (Ethernet.hardwareStatus() == EthernetNoHardware) {
Serial.println("Ethernet shield was not found. Sorry, can't run without hardware. :(");
while (true) {
delay(1); // do nothing, no point running without Ethernet hardware
}
}
if (Ethernet.linkStatus() == LinkOFF) {
Serial.println("Ethernet cable is not connected.");
}
// try to congifure using IP address instead of DHCP:
Ethernet.init(53);
Ethernet.begin(mac, ip, myDns);
} else {
Serial.print(" DHCP assigned IP ");
Serial.println(Ethernet.localIP());
}
// give the Ethernet shield a second to initialize:
delay(1000);
Serial.print("connecting to ");
Serial.print(server);
Serial.println("...");
// if you get a connection, report back via serial:
if (client.connect(server, 80)) {
digitalWrite(LEDmerah1, HIGH);
digitalWrite(LEDmerah2, HIGH);
digitalWrite(LEDmerah3, HIGH);
Serial.print("connected to ");
Serial.println(client.remoteIP());
// Make a HTTP request:
client.println("GET /search?q=arduino HTTP/1.1");
client.println("Host: www.google.com");
client.println("Connection: close");
client.println();
} else {
// if you didn't get a connection to the server:
Serial.println("connection failed");
}
beginMicros = micros();
}
void loop() {
// if there are incoming bytes available
// from the server, read them and print them:
int len = client.available();
if (len > 0) {
byte buffer[80];
if (len > 80) len = 80;
client.read(buffer, len);
if (printWebData) {
Serial.write(buffer, len); // show in the serial monitor (slows some boards)
}
byteCount = byteCount + len;
}
// if the server's disconnected, stop the client:
if (!client.connected()) {
endMicros = micros();
Serial.println();
Serial.println("disconnecting.");
client.stop();
Serial.print("Received ");
Serial.print(byteCount);
Serial.print(" bytes in ");
float seconds = (float)(endMicros - beginMicros) / 1000000.0;
Serial.print(seconds, 4);
float rate = (float)byteCount / seconds / 1000.0;
Serial.print(", rate = ");
Serial.print(rate);
Serial.print(" kbytes/second");
Serial.println();
// do nothing forevermore:
while (true) {
delay(1);
}
}
}
(code di atas sudah di modifikasi)
apabila code sudah berhasil ter upload dan ethernet telah connect internet maka lampu akan menyala
THANK YOU SEMOGA MEMBANTU YA


Comments
Post a Comment