HOW TO SOLVE LCD & I2C ERROR / Solusi Cepat Mengatasi Masalah Pada LCD 16x2 DAN NOT WORK MICROCONTROLLER ARDUINO MEGA
Assalamualaikum wr wb
Semoga kawan-kawan semua dalam keadaan sehat jasmani dan
rohani aamiin
Awalnya saya upload program saya tetapi LCD hanya menampilkan kotak kotak atau ERROR
Berikut ini adalah cara mengatasi LCD dan I2C yang error
- Bahan bahan =
1.
LCD 16X2
2.
Arduino Mega
3.
Kabel male-female
4. I2C (saya pake merk RobotDyn)
2. Rangkaian
I2C
= Arduino Mega
+5V =
+5V
Gnd =
Gnd
SDA =
Pin 20 SDA
SCL =
Pin 21 SCL
// --------------------------------------
// i2c_scanner
//
// Version 1
// This program (or code that
looks like it)
// can be found in many places.
// For example on the
Arduino.cc forum.
// The original author is not know.
// Version 2, Juni 2012, Using Arduino 1.0.1
// Adapted to be as simple as
possible by Arduino.cc user Krodal
// Version 3, Feb 26 2013
// V3 by louarnold
// Version 4, March 3, 2013, Using Arduino 1.0.3
// by Arduino.cc user Krodal.
// Changes by louarnold
removed.
// Scanning addresses changed
from 0...127 to 1...119,
// according to the i2c scanner
by Nick Gammon
//
https://www.gammon.com.au/forum/?id=10896
// Version 5, March 28, 2013
// As version 4, but address
scans now to 127.
// A sensor seems to use
address 120.
// Version 6, November 27, 2015.
// Added waiting for the
Leonardo serial communication.
//
//
// This sketch tests the standard 7-bit addresses
// Devices with higher bit address might not be seen properly.
//
#include <Wire.h>
void setup() {
Wire.begin();
Serial.begin(9600);
while (!Serial); // Leonardo:
wait for serial monitor
Serial.println("\nI2C
Scanner");
}
void loop() {
int nDevices = 0;
Serial.println("Scanning...");
for (byte address = 1; address
< 127; ++address) {
// The i2c_scanner uses the
return value of
// the Write.endTransmisstion
to see if
// a device did acknowledge to
the address.
Wire.beginTransmission(address);
byte error =
Wire.endTransmission();
if (error == 0) {
Serial.print("I2C
device found at address 0x");
if (address < 16) {
Serial.print("0");
}
Serial.print(address, HEX);
Serial.println(" !");
++nDevices;
} else if (error == 4) {
Serial.print("Unknown
error at address 0x");
if (address < 16) {
Serial.print("0");
}
Serial.println(address,
HEX);
}
}
if (nDevices == 0) {
Serial.println("No I2C
devices found\n");
} else {
Serial.println("done\n");
}
delay(5000); // Wait 5 seconds
for next scan
}
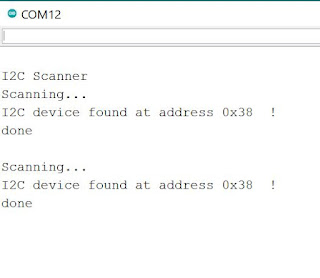
Setelah di upload buka serial monitor nya maka akan muncul alamat I2C
nya yaitu 0x38
4. Upload program yang diinginkan dengan
memasukan alamat LCD dan I2C yang benar seperti berikut contoh sederhana program
nya
//Jangan lupa download library LiquidCrystal_I2C.h
#include <LiquidCrystal_I2C.h>
LiquidCrystal_I2C lcd(0x38, 16, 2); // set
the LCD address to 0x38 for a 16 chars and 2 line display
void setup()
{
lcd.init();
// initialize the lcd
//
Print a message to the LCD.
lcd.backlight();
lcd.setCursor(0, 0);
lcd.print("Hello");
lcd.setCursor(0, 1);
lcd.print("from Bandung");
}
void loop()
{
}


Comments
Post a Comment